
Auracle for X-Series Deep Dive: Pt. 3: AUDIO4C Audio Page
Auracle for X-Series
Deep Dive
Part 3: AUDIO4C Audio Page

What is Auracle for X-Series?
Auracle for X-Series is the free control software that allows you to set up and configure your iConnectivity audio and MIDI Interfaces. In this new video series, we’ll be walking through all the features of Auracle for X-Series so you know exactly how to set up and configure your interface. In this video, we’ll be taking a look at the audio page, and specifically the audio page when we’re using an AUDIO4C or older iConnectivity audio interface.
While in this video we use an AUDIO4C, the configuration and settings for any other iConnectivity audio interface (other than the PlayAUDIO12) will be identical.
The audio page in Auracle for X-Series will look slightly different based on what interface you have connected to your computer, but will always have similar controls.
Before we dive into today’s video make sure you’ve downloaded Auracle for X-Series and installed it on your computer.
Entering the Audio Page
With your audio interface connected to your computer, click the Audio button to enter the audio page.

Entering the Audio Page of Auracle for X-Series with the AUDIO4C
Configuring Analog Inputs
Starting at the left of the audio page, you can configure the analog inputs of your audio interface. You can set the level of your inputs using the fader, or type in an exact value. You can mute your inputs, enable phantom power, or choose High Z for an instrument input like a guitar.
The amount of inputs shown will depend on the physical inputs on your interface, but the process is the exact same.

Configuring Audio Inputs on the AUDIO4C using Auracle for X-Series
Configuring Analog Outputs
Next, we can set the output level of our analog outputs. Similar to inputs, we can set the gain using the fader, or type in an exact value for output. You can also mute your output, or choose to manage mono channels or stereo pairs.
You can also set the level of your headphone output, mute, or choose to manage your headphone output as two mono channels, or a stereo pair.

Configuring and adjusting Analog Outputs on the AUDIO4C using Auracle for X-Series
Mode Selector Overview
A unique feature included in Auracle for X-Series is the Mode Selector. Choosing between the 4 different modes will change the faders and settings in the bottom half of the screen.
If you’re looking to use your interface for recording, choose Record.
If you’re using the device connected to USB 1 for playback of clicks, tracks, and stems, choose Play USB1.
If you’re using the device connected to USB 2 for playback, choose Play USB2.
If you’re using your interface to stream with your computer, phone, or tablet, choose Stream.
Choosing any of the modes, will pre-configure settings and optimize your interface, for that specific purpose.
You can customize and configure the settings however you’d like, but the starting point is configured and optimized for the specific mode you choose.

Mode Selector options in Auracle for X-Series
Record Mode Overview
Choosing Record mode will optimize the interface for recording. You can create mixes for analog outputs 1/2, 3/4, and your Headphones Mix, choosing between USB 1 1/2, USB2 1/2, and Analog Inputs 1-4 as your sources.
Click through each mix to see the default settings for each output. Again, while the defaults have been optimized for this particular setup, you can configure each mix specifically for your scenario.
You can adjust the fader or type in an exact value for the volume of the source, adjust the pan or type in an exact value of the pan and you can mute, solo, or choose to manage mono or stereo pairs.

Record Mode Selector in Auracle for X-Series
Play USB1Overview
If you’re using your audio interface in a playback scenario to run click and tracks, and your computer is connected to USB port 1, you should choose Play USB1.
You can choose from channels 1-6 from USB 1, and channels 1/2 from USB 2 for your Analog 1/2, 3/4, and Headphone output mixes. Click through each mix to see the default settings for each output.
In this mode the interface is configured for a 1 for 1 scenario where outputs 1-6 from your DAW will be pre configured to match outputs 1-6 of your interface. For example, Analog 1/2 Mix is USB 1 Channels 1/2 by default. Analog 3/4 Mix is USB 1 Channels 3/4 by default and Channels 5/6 from USB 1 are Headphones Mix.
Again, it’s worth noting you can customize and change any of the default settings.
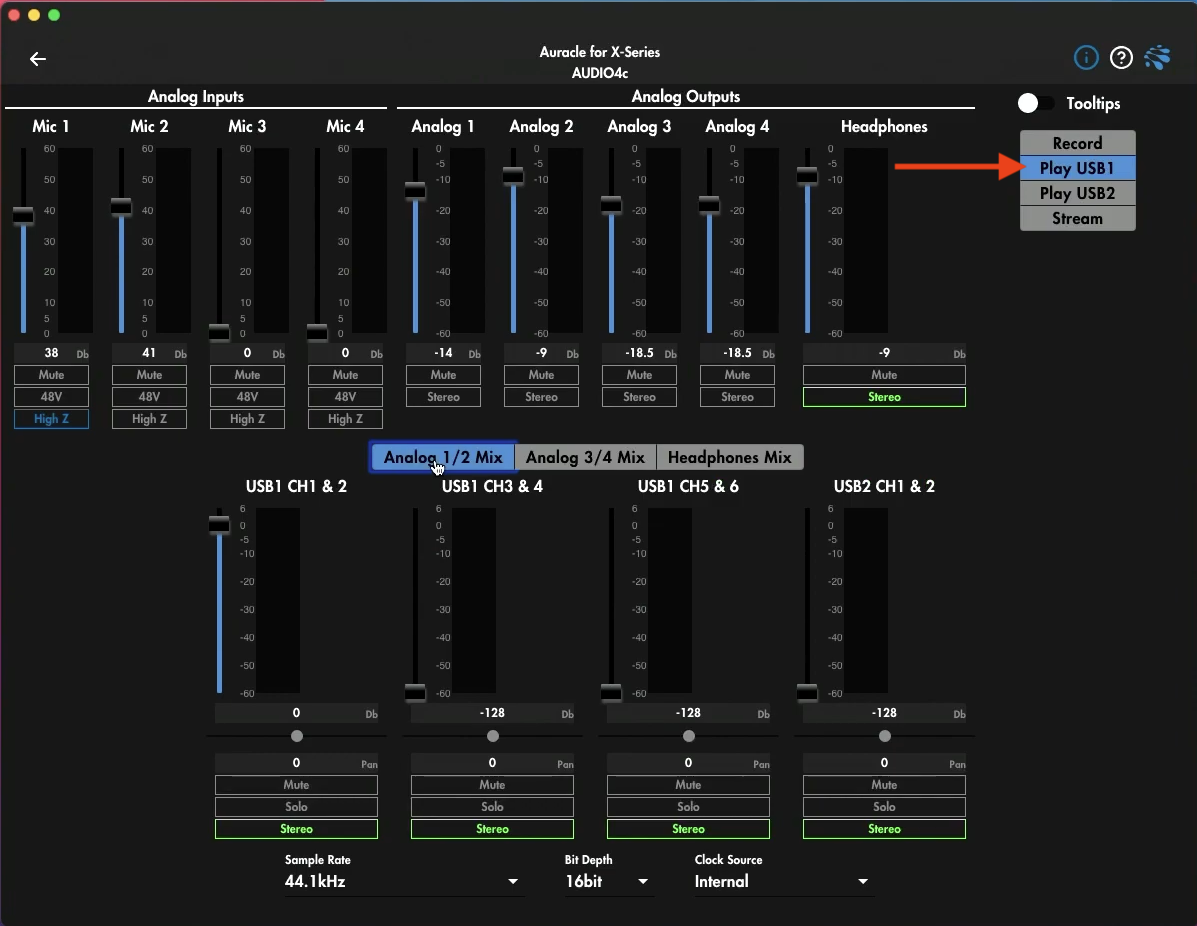
Play USB1 Mode Selector in Auracle for X-Series
Play USB2 Overview
Play USB 2 functions very similar to Play USB 1, except for the fact that your main sources will be from the device connected to USB port 2. If you’re using the device connected to USB 2 input as your main playback device, you should choose Play USB2.
You’ll be able to choose from Channels 1-6 from USB 2, and Channels 1/2 of USB 1 to create mixes for Analog 1/2, 3/4, and Headphone outputs.
Again, click through the default mixes to see the default settings and customize the settings to suit your scenario.

Play USB2 Mode Selector in Auracle for X-Series
Stream Mode Overview
If you’re using the AUDIO4C with your computer, phone, or tablet to stream or for a virtual call (like Zoom or Skype) you should use Stream mode. This is a unique mode, with features exclusive to Auracle for X-Series.
Similar to the other modes, you can create mixes for outputs 1-6, but you also can create 2 virtual “loop-back” mixes that send audio back to the devices connected to USB 1 and USB 2. This makes the AUDIO4C and Auracle for X-Series the perfect solution for any streaming scenario, or Zoom call.
To start, we can choose from output 1/2 of USB 1, output 1/2 from USB 2 and our 4 analog inputs to create mixes for analog outs 1/2, 3/4 and our headphone output 5/6. But, in addition to that we can use those same sources to create loop-back mixes to our devices connected to USB 1 and 2.
For example, if I’m using my AUDIO4C for a Zoom call, I can use the headphone output to create a headphone mix for myself, turning up USB1 1&2 so I can hear the output of Zoom, but making sure to turn down Mic 1 so I don’t hear myself talking.
For USB1 Mix (the mix that goes to Zoom) I can turn up my mic and turn down USB1 1/2 to make sure the other members of my Zoom call can hear me, but not hear themselves.
With Stream mode, there really are endless possibilities of what can be created and streamed using the AUDIO4C.

Stream Mode Selector in Auracle for X-Series
Adjusting Sample Rate, Bit Depth, and Clock Source
At the bottom of the page you can adjust the sample rate, bit-depth, and clock source of your AUDIO4C.
In general, don’t adjust these settings unless you know what you’re doing, or iConnectivity Support suggests you adjust the settings.

Adjusting Sample Rate, Bit Depth, and Clock Source on AUDIO4C in Auracle for X-Series
Tooltips
With all the settings and modes available in Auracle for X-Series, it’s easy to forget exactly what a setting is, or what it does.
To make this easier, you can enable the Tooltips feature and hover over any text that is yellow, to get a tooltip pop-up that explains exactly what each setting is, and what it does.

Enabling Tooltips in Auracle for X-Series
Stick around as we continue our deep-dive in Auracle for X-Series. In our next video we will take a look at MIDI routing in Auracle for X-Series.