
PlayAUDIO Audio on Auracle
With version 1.8.0, Auracle supports a streamlined version of PlayAUDIO configuration. We understand that this isn’t 100% of everything that’s possible with our other tools, but we hope that this covers and centralizes all that’s key to your setup.
Let’s get you introduced in five parts: orientation & one time actions, basic audio settings, outputs or headphones, failover settings, and parting tips.
(Note: this is meant to be a text walk-though. If you’d like to go through a video tour, we’ve got one located on this page.)
Orientation & One Time Actions
For the first time, plug in your PlayAUDIO12 or PlayAUDIO1U using the USB 1 device port to your laptop. You can connect through another port or RTP, but you’ll need to be connected to this port if you need to update your firmware in this section.
You should see your device appear.

As you can see, the functionalities are broken up into different sections. For this page, we’ll mostly focus on Audio since the other pages have their own tutorials.
One time action - firmware: you may see a yellow or red firmware alert on your device, similar to what is shown with the example mioXL above. To update your devices, go into the firmware page and click on the Install button to load the latest firmware from the web. This will take approximately 30 seconds. You will see a lot of lights flashing on the front panel of your PlayAUDIO device, but it will eventually reboot and return.
Now, let’s press the audio button and go to the audio page. You may see an alert to clear your audio settings. There’s a one time action involved here. If you don’t see it, feel free to skip straight past reading this action. Just remember: if this doesn’t quite work and you have a PlayAUDIO12 with a lot of custom audio configuration, you may have to do a factory reset to get everything working just right.
One time action - audio reset: you may see a prompt asking you if the software can reset your audio setting in order to get working. This will only change your setting if you say yes. If you have a rock-solid setup with a previous configuration software, then we wouldn’t recommend taking the next step. If you say yes, this will reboot your device as part of the process. It should come back within 15 seconds.
After this, you should be able to see a full set of audio settings, which brings us to the next section.
Basic Audio Settings

Let’s see what we have in this layout.
The top left has the Scene A/Scene B buttons, which manually switch between the configuration scenes. Scene A has the computer connected to USB Port 1 driving audio outputs. Scene B does the same but for the computer on USB Port 2.
The top middle has basic failover commands. There is a button to Arm Failover. This arms the failover - an automatic jump to Scene B and your backup audio computer if something goes wrong with the computer driving Scene A. You can also see the current status of failover as well as Disarm Failover if you like.
The top right has a choice between Outputs - where the headphones output at the front is treated as two additional independent outputs - and Headphones - where the headphones output is fed a mix of the 10 other outputs. The big distinction is in the visualized output channels.
The center has your levels and outputs. This example image layout is for 12 independent outputs. Each output level can be adjusted from 0dB to -128dB, either using the Level Slider or as numbers entered into the Level Text Input. Each channel has a Mute button and an Audio Meter. We encourage you to play some audio to the PlayAudio12 and light up the meters!
The bottom has a set of selectable options. Sample Rate configures between 44.1kHz, 48kHz, 88.2kHz, and 96kHz output sample rates. Bit Depth configures between 16-bit and 24-bit audio output. Clock Source configures between internal clock or clock fed over USB. Just note that some of these settings will keep you from using a headphone mix (it’ll be clear) and all of these setting changes require a device restart to take effect.
The last button is the advanced Failover Settings. We’ll cover that in the later failover settings section.
Outputs or Headphones?
That is the question.
Outputs: If you’re looking to drive 11 or 12 independent PlayAUDIO12 outputs (13 or 14 on the PlayAUDIO1U), the decision is made for you. You want to click on the Outputs option. We think this is fairly self explanatory when it comes to it. Your USB audio outputs 1-12 will correspond to each output channel.
Headphones: If your needs only go up to 10 outputs (12 on the PlayAUDIO1U), then let’s go with the headphones mix. Click on that Headphones option and take a look.
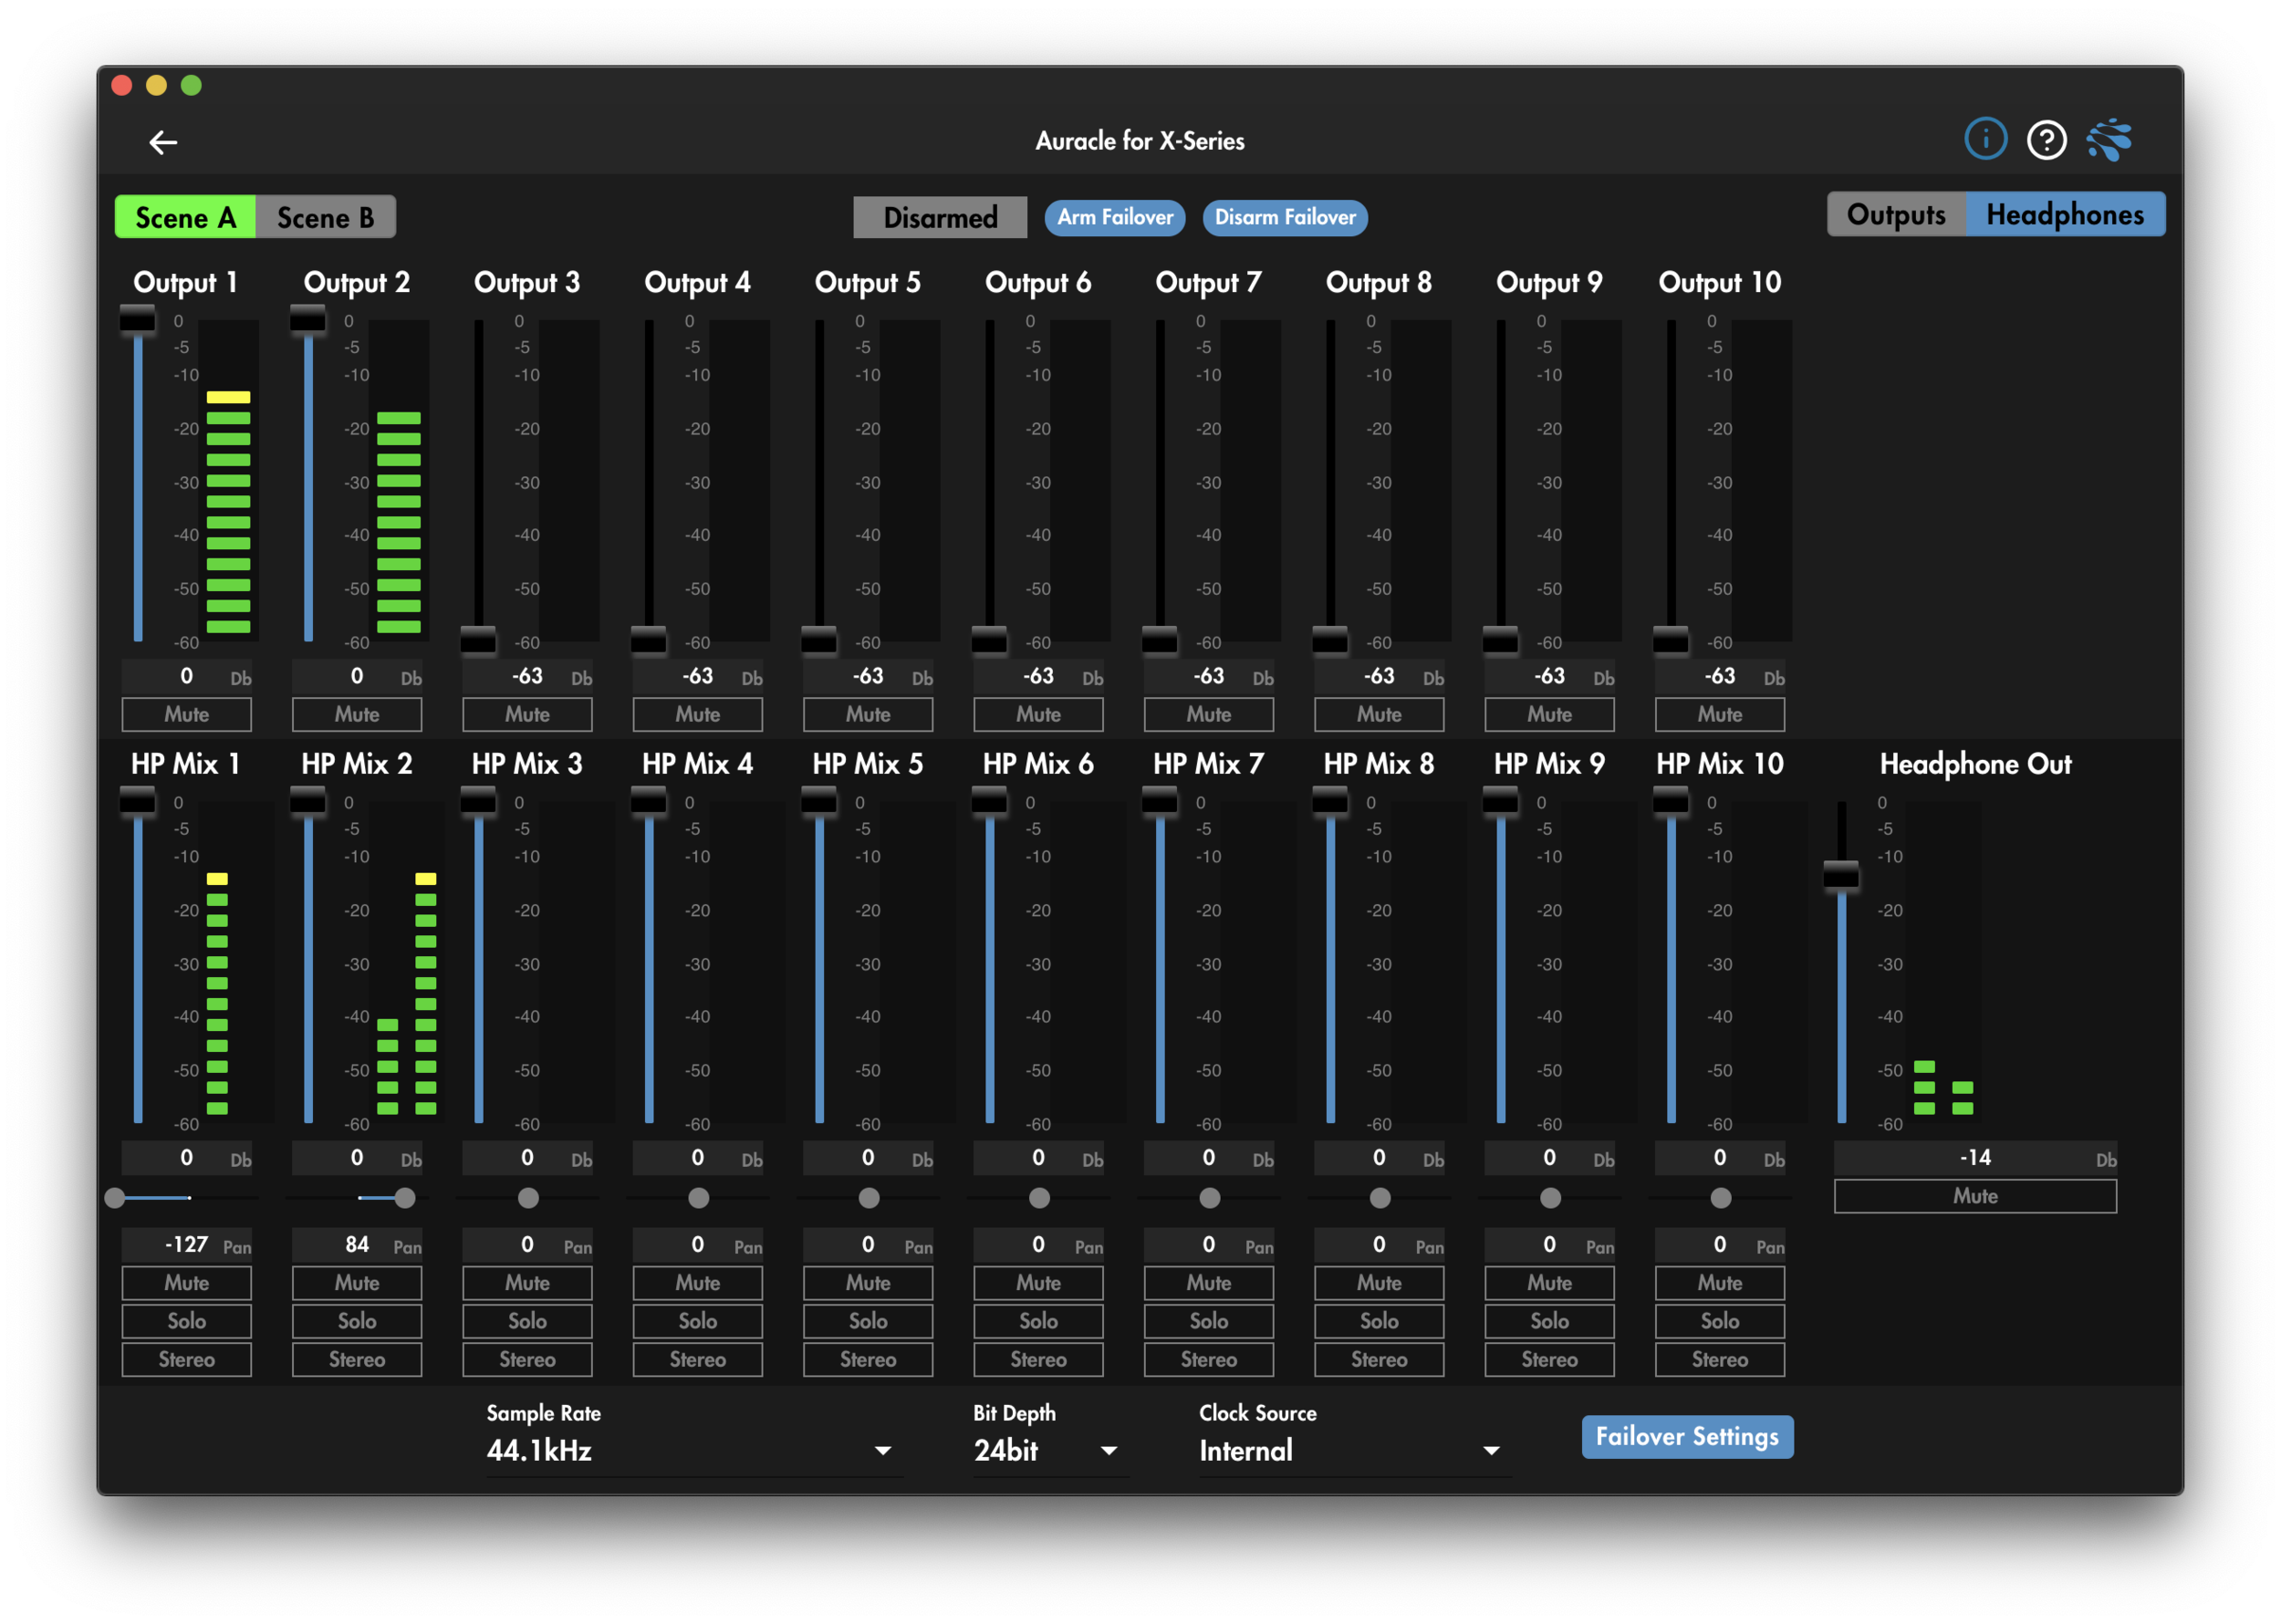
Not too much changes, but two things have happened: Outputs 11-12 have disappeared and a new row of channels have appeared!
Each one of your 10 output channels is automatically routed into a headphone mixer channel. Each headphone channel has dual meters, a pan slider + text box, and buttons; items that are different from or in additional to the parts of an output channel. Let’s go through all the parts:
Level Slider + Level Text Input. This is the level you want this input to have in the headphone mix. Same 0dB to -128dB range.
Left and Right Audio Meters. When you pan the output, you’ll be sending different volumes to the left and right, so they’re individually shown. This split’s controlled by pan.
Pan Slider + Pan Text Input: This goes from -127 for full left to 127 for full right. Controllable using slider and text box, depending on what you’re feeling.
Mute: Mutes this channel in the headphones mix.
Solo: Mutes all channels except for all channels with Solo enabled in the headphone mix. Acts just like a solo when you have only one solo selected as a time, but you can pick multiple channels to “solo.” Yes - please laugh about the absurdity of multiple solos.
Stereo: Links two channels together into a stereo pair. This can only be done with corresponding channels: 1&2, 3&4, 5&6, 7&8, 9&10.
For the headphone mix outputs, you have the same controls as an output channel. Should make sense at a glance by now after all these button explanations.
Failover Settings
If you’re setting up failover, we’re sure you’ll want it to be just right. Click on the Failover Settings and we’ll go through what you can tune.

Ah, that’s a lot of buttons. Let’s go through this bit by bit:
Trigger Mode: how do you want to fail over? Audio, MIDI, Either (which means if either drops, you fail over), or Both (requires both audio and midi to fail).
Auto Arm: Automatically arm failover from A to B.
Auto Switch to Scene A: If the computer for Scene A is connected and good, automatically switch over to Scene A. This is useful if you want to automatically jump back to A after a failover to B.
Audio Trigger, Audio Channel, and Audio Timeout: Only enabled when audio is chosen as part of failover. The trigger can be that the host is connected, audio is recognized, or whether the failover signal from LifeSine is cut. Audio Channel designates which channel LifeSine is expected on (default 13). Audio Timeout designates how fast the failover should kick in (default 2ms).
MIDI Trigger, MIDI Channel, and MIDI Timeout: Only enabled when midi is chosen as part of failover. The trigger can be that the host is connected, midi is recognized, or whether the failover signal is cut. MIDI Channel designates which channel the failover signal is expected on (defaults to 1, but any channel is great). MIDI Timeout designates how fast the failover should kick in (default 100ms).
Send MIDI on Failover: If you’re sending MIDI to both USB Ports, you might want to manually send a clear down to your instruments on failover. If that’s a prudent move for your configuration, you can choose a combination of Sustain Pedal Off, All Sound Off, All Notes Off, or Reset All Controls. You can control which MIDI channels and MIDI ports this is sent to by default.
Parting Tips
There are a few things we’d like to mention before leaving you.
Scenes will show up on the MIDI page. Keep in mind that each scene will have its own MIDI routing configuration on the PlayAudio12.
If you want to auto-route Scene B as a mirror of Scene A, go to the preset page and click on Mirror Scene Settings. This will set everything to be the same routes from Scene A to Scene B, with the exception that all USB Port 1 and USB Port 2 routes are flipped.
Speaking of saving - if you were saving your settings previously by bumping the physical button, you can also do that in software now. Preset page’s Save button does the job.
This was mentioned before, but if you have a previous configuration from iConfig or Auracle… things might act a bit strangely on the audio setting page. It’s not designed to on purpose, but this is more of a just-in-case piece of advice. If you’re willing to give it a shot, those issues should be solved with a full device reset. You’ll find the button to do this in the little info icon for the device on the device selection screen.
If you’ve got problems or suggestions, let us know using our support form. We can’t get to every thing, but we do use feedback to figure out what’s important to people and prioritize what’s coming next.