How to connect via RTP from your interface to your computer | 2 Ways
How to create a Network Connection
Every network setup needs an initiator and a responder.
The initiator says “Hey, anyone out there?” and the responder waits until it hears this and says “ Yeah, I’m here, let’s connect.”
With an iConnectivity interface you have 2 options for setting up a network session.
1) The computer is the initiator and the interface is the responder
2) The Computer is the responder and the interface is the initiator.
We recommend option 2 for most use cases.
The major advantage to option 2 is that you do not have to manually connect the RTP ports on every startup of the computer. If the interface is in initiator mode it will continue to search for the computer and once it sees the computer running it will connect.
It will be a bit extra work up front but much less overall.
The video that was posted above shows both options if you would like to see a live version of the connections being made. Here are the written instructions for both options (Mac & Windows)
Option 1 & 2 steps - Some of the steps are similar from the computer side.
Navigate to Audio MIDI setup on your Mac - Applications>Utilities>Audio MIDI Setup
Open the MIDI studio (Window>Show MIDI studio)
If the MIDI Studio does not show and you see the Audio Window navigate in the menu to Window> Show MIDI Studio.
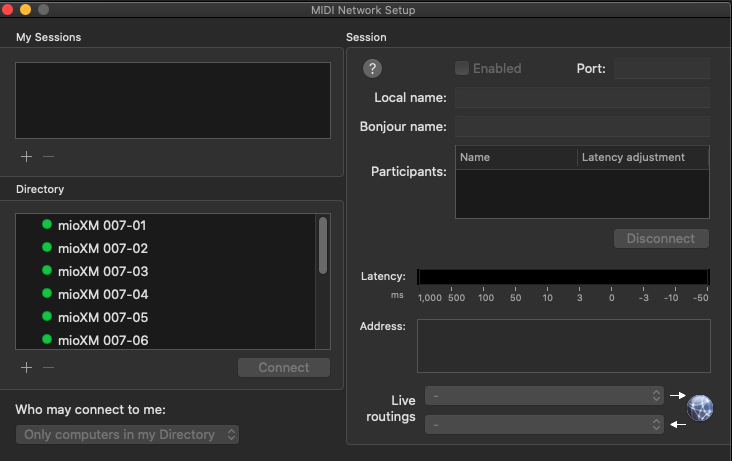
Click the globe icon that says Network Setup. Depending on Mac OS this might be in the window bar or as a box inside the MIDI Studio window.
The next step is where Windows users can pick up using RTPMIDI as this is a very similar software as the Apple built-in option.
Before starting you may need to change the Who may connect to me option int he bottom left corner to Anyone. You must create a session before you can change this.
Start by clicking the “+” button under the Sessions box to add a new session.
When you select that session in the sessions box you will see the details on the right side.
Let’s go through those options:
Local Name - This name is what will appear on the network for this session. Name this something easy to associate with for the connection you need here.
Bonjour Name - This is the name that helps the sessions connect together. Take note of the spacing and be specific here.
The Local and Bonjour names can be the same or different.
Enter a Local Name and Bonjour Name based on the information above.
Note: Once you enter the Bonjour Name, make sure you click somewhere else on the window or press enter. If you fill in information and do not click out of the box it will default to whatever the original settings for your computer are. This can cause connection issues.
Once this is done click the Enabled button.
OPTION 1
Go to the Directory box and select the RTP port you want to connect to the computer.
Once Selected hit Connect under the Directory box.
After hitting connect the RTP should now show in the Participant box on the right side.
This should show a latency time amount like 0ms or 1ms. If you see ??? something is wrong with the connection.
OPTION 2
Go into Auracle X and select the RTP / Network MIDI button.
On this page you will have a dropdown menu by each RTP port.
Please change the dropdown from Responder (default) to Initiator.
You now see the options for IP or Name.
In this setup we will use Name. This is where you enter the Bonjour Name of the network session you created earlier in Network Setup in MIDI Studio(Mac) OR RTPMIDI app (Windows).
Once entered, so that the names are identical, select Save.
The connection should now be made and you will see the connection details show to the right of the RTP port information in Auracle X. Also check RTPMIDI or Network Setup on your computer to see that the RTP port name is showing under Directory with a time latency showing (0ms, 1ms, etc..) and not ???


